Setting up GSuite GMail Custom Domains With AWS Route53
Do you want to send emails from your custom domain hosted on AWS? There's a few pitfalls that aren't well documented.
The free, official "Check MX" tool will help you debug these issues, and you should use it, but it doesn't have Route53 specific instructions.
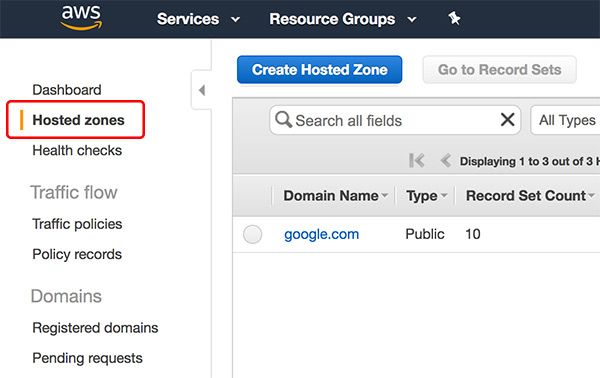
1. Log in to AWS and go to Route53
Log in to your AWS management console and find the "Route 53" (direct link) product, which is Amazon's name for DNS management. Then click on hosted zones.
2. Create the MX records
If you don't have a domain name here, then your DNS isn't managed by AWS, and this article is not right for you!
First the easy part:
- Click on your domain
- Then click "Go to Record Sets"
- Then click "Create Record Set"
- Leave the name blank
- Change the type to "MX - Mail Exchange"

Change the TTL field to 3600.
Then in the "value" field, paste in exactly (this is the same for everyone):
1 ASPMX.L.GOOGLE.COM
5 ALT1.ASPMX.L.GOOGLE.COM
5 ALT2.ASPMX.L.GOOGLE.COM
10 ALT3.ASPMX.L.GOOGLE.COM
10 ALT4.ASPMX.L.GOOGLE.COM
Note: these values come from the official documentation, formatted here for Route53's syntax. If you want, you can verify the hosts. They aren't likely to change.
3. You're Done! Unless...
This is the basic setup you need to send emails with DNS in Route53. However, Google suggests you verify your domain with some more security steps. The previously mentioned "Check MX" tool will complain if you stop here. You should verify your bananas!
4. Add a "SPF" text entry
Create a new TXT entry with no name:

For the value, paste in exactly (with quotes):
"v=spf1 include:_spf.google.com ~all"
Then click "Create". The use of SPF records is documented here if you're curious.
If you already have a TXT record with no name and Route53 errors, then put the above line in the existing TXT record, with quotes, on a new line, and save it.
5. Create the "domain key" / DKIM record
Google's tools and interface are often nightmarish and poorly documented, so I'm including some screenshots.
Log in to your Google Suite admin console using your Google Suite admin account: https://admin.google.com/.
Navigate the maze: Apps > G Suite > Gmail > Authenticate Email.
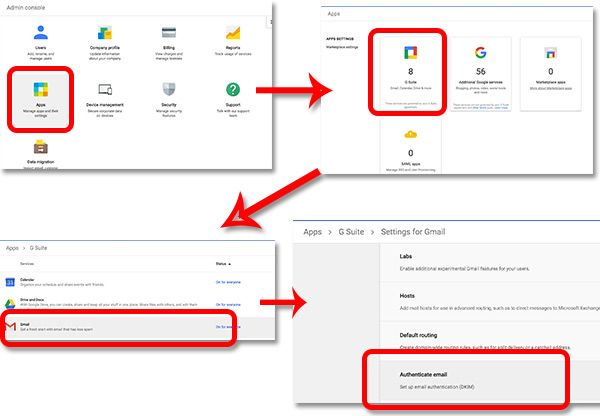
Now click "Generate new record". Don't click anything else yet.
Back in Route53, create a new, named TXT record. For the name, paste in the name from your generated record in GSuite. It's probably "google._domainkey". Change the type to "TXT - Text":

Now for the tricky part. Google tells you to paste in the whole TXT record value from GSuite admin, but if you do, you'll get the error:
CharacterStringTooLong (Value is too long) encountered with '"v=DKIM1;...
The solution to this is to chop up your value into multiple quoted strings (not new lines), with a maximum of 255 characters in each string, and a space between each chunk. It doesn't have to be equal chopping.
For example, if your value looks something like:
"v=DKIM1; k=rsa; p=abcdefghijklmnopqrstuvwxyzabcdefghijklmnopqrstuvwxyzabcdefghijklmnopqrstuvwxyza bcdefghijklmnopqrstuvwxyzabcdefghijklmnopqrstuvwxyzabcdefghijklmnopqrstuvwxyzabcdefghijklmnopqrstuvwxyzabcdefghijklmnopqrstuvwxyzabcdefghijklmnopqrstuvwxyzabcdefghijklmnopqrstuvwxyzabc"
You can chop it up at arbitrary places:
"v=DKIM1; k=rsa; p=abcdefghijklmnopqrstuvwxyzabcdefghijklmnopqrstuvwxyzabcdefghijklmnopqrstuvwxyz" "abcdefghijklmnopqrstuvwxyzabcdefghijklmnopqrstuvwxyzabcdefghijklmnopqrstuvwxyzab" "cdefghijklmnopqrstuvwxyzabcdefghijklmnopqrstuvwxyzabcdefghijklmnopqrstuvwxyzabcdefghijklmnopqrstuvwxyzabc"
Note those are single spaces, not newlines, between each chunk!
Paste the chopped up value (including all quote marks on all lines) into the value and create your TXT record.
Then, when Google gets off its lazy behind and fetches your new DNS records, you can click the "START AUTHENTICATION" button on the GSuite admin page. It should be pretty fast, and you can tell it has started when you see:

Don't worry if it complains about your DNS not updating, you can click "START AUTHENTICATION" as many times as you want!
7. Troubleshooting
The Check MX tool usually gives good output and instructions. If you want to verify you set up your TXT and MX records correctly, you can try this from the command line.
Verify the domain SPF:
$ dig -t TXT yourdomain.com

;; QUESTION SECTION:
;yourdomian.com.			IN	TXT

;; ANSWER SECTION:
yourdomian.com.		300	IN	TXT	"v=spf1 include:_spf.google.com ~all"
Verify the domain key (if you named it, replace _domainkey):
$ dig -t TXT google._domainkey.yourdomain.com

;; QUESTION SECTION:
;yourdomian.com.			IN	TXT

;; ANSWER SECTION:
google._domainkey.yourdomain.com.	300 IN	TXT	"v=DKIM1\; k=rsa\; p=...
8. That's It!
If this post helped you configure your GSuite email, consider following me on Twitter.